Monday 30 June 2014

Illustrated text project - final piece & evaluation


Evaluation of Final Piece

Overall, I am relatively happy with my final piece because I like the story and characters and I’m proud of the fact that I’ve managed to create something using Photoshop and Illustrator. These are not programs that I am used to working with and I have previously struggled using them.

The idea behind this story is based around the promotion of healthy eating through an entertaining comic book story for children aged between 6 and 12, around Primary school age. I wanted the story to be fun and engaging for the reader while having an important moral at the end.
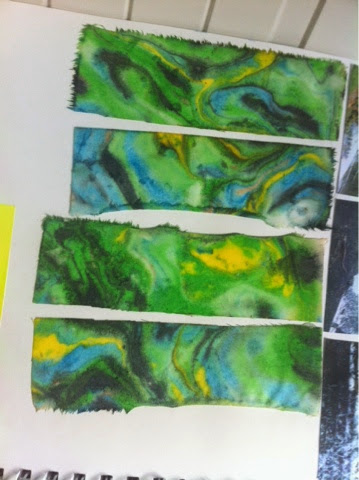
I illustrated the characters using water colour paints and black sharpie pen, which I then photographed and manipulated in Photoshop. I lightened the illustrations, made the colours brighter and the lines bolder, so that the colours really ‘popped’. The backgrounds were simple photographs of my kitchen, which I lightened and contrasted with the illustrations so that the darkness of the photographs draws the reader’s attention to the illustrated characters. 

I created the story based on superheroes as this is something quite specific that most children are aware of, if not a big fan of! I wanted to show that the unhealthy food had been defeated without making the story too violent, therefore fun superheroes was the way to go in my mind! I also looked at the characters from Scooby-Doo as this was more the kind of idea I was going for. The Scooby-Doo series seems to portray solving crimes and working together without showing violence or scaring children.

Although there are two evil characters in my story, the cutesy style that I drew them in makes them appropriate for younger children as they aren’t scary or demonic in any way. Also, the story has a happy ending which leaves children feeling positive and sending them away with a fun view on healthy eating.

The layout of the comic could be better, looking back I think it would look more professional if the text was in boxes as well as the images. I also think it would be better if there wasn’t as much writing and the story was more speech bubble based. It might be a good idea to reconsider some of the words used in the story as a few could possibly cause younger children difficulty when trying to understand.

I think the images are very bold and the cutesy, bright style will attract children and draw them into the story. Hopefully, this light-hearted take on beating fatty foods will sink in to younger children.

The story could be open to sequels as the ‘Super Fruit’ team could be called out to any kind of healthy eating emergency; however the ending is quite closed so that a sequel is not inevitable. This leaves me with the possibility of taking this idea even further if originally successful and loved by children. There is plenty of room for more character development and also the possible addition of more characters, especially evil ones, again, like the Scooby-Doo series.


Thursday 26 June 2014

Marbling ink video

This is a short video of me just playing with the ink on the surface of the water to give you some idea of how the ink reacts to the water :) enjoy!

My marbling ink samples

These are the photos I took while I was using the marbling inks! I used a tray and poured some water into it - not a lot but enough to fill the bottom with a little depth.
 
Below are the marbling inks I used, I didn't have many colours but they are all quite bright.


This is the sample that looks like elephant skin, all I did was drip some black ink into the water and it started to spread out so I quickly threw a piece of white cotton in to capture the ink as it was spreading! I really like this sample actually and I also think it looks a little like water where the light catches the ripples, only on the bit where the ink has spread out more though.


This was a paper sample I did but the ink just stuck to the paper and looked really greasy! It also took absolutely ages to dry and it's made the paper more, sort of, brittle as well. It does look quite cool now it's dried though!


This is a small fabric sample where I was just playing with colours and how they swirled around each other but didn't blend together! The power of ink! I vaguely remember why from science lessons at secondary school... something about hydrophobic and hydrophilic, oil is hydrophobic so has a "phobia" of water and therefore they won't mix! Hydrophilic is when the substance will mix with water :) science taught me something at least...

 
For this sample I used black and orange inks to try and create a tiger fur kind of effect, however the colours stayed mainly in their 'blobs', rather than spreading and forming stripes like I'd hoped, but ah well, it's all experimenting! This was also on paper and has given the paper brittle, greasy kind of feel.


These four images show the process, the first shows the ink having been dripped into the water, it just sort of stays in it's blobs and gradually begins to spread out, but doesn't mix.


To create this effect I have just swirled the colours round with a stick to make swirls and mix the colours more.


I then put four small pieces of cotton into the water and as you can see, they have soaked up the ink! :)


These are the four pieces of cotton that I marbled, now stuck into my book! I like the top two best as they both capture the swirls that I created.

Marbling inks

"Suminagashi or "floating ink" is the process of marbling plain paper with water and ink to transform it into something vibrant and colorful. It originated in Japan as early as the 12th century."
This is traditional marbling that I found on youtube, I have some marbling inks so I tried this technique out and it produced some great pieces of work! I originally was going for how 'scum' is like a skin on top of water, like a swirly, oily, foamy froth, and having used marbling inks as a child, I remembered that they might be able to portray the kind of effect that I wanted.

I ended up having a play with them and created something that looked like elephant skin! I also used white cotton mostly instead of paper to see what kind of effect that created, which looks fab because the cotton soaks up the ink. The only problem I found was that when you pull the paper / fabric out of the water the inks run a little, but you just have to be careeful when removing it. Sometimes its good to drip the inks in and then leave them, rather than swirling them round with a stick, this is what created the elephant skin effect. I videoed myself using the technique so I shall put that up on here too along with pictures of what I created.

Tuesday 17 June 2014

Life drawing - the final sketches

 These are the final life drawings I did towards the end of our term of life drawing. I think many of these are my strongest pieces as they show where my style is now that I have had time to develop certain techniques and find out what works for me and what doesn't.

I really like this piece however I had the same problem of the head being too small, other than that I love the definition and the shading. Charcoal is definitely a medium I love working with and one of my strengths when it comes to sketching.


The body is totally out of proportion in this drawing but it's almost like some kind of crazy perspective abstraction, so fits in nicely with moving to look at abstraction of the human form.


This is another finger painting piece which I really like as it's messy but refined. The torso is slightly out of proportion which is a problem I seem to keep having! This is probably something I should work on in my own time, however, getting someone who's up for modelling nude for you is not exactly easy!


I was being way too perfectionist on this drawing as I didn't get to finish it! However it looks pretty good so would've been a pretty good piece if I had finished it.


The following drawings were drawn using a piece of charcoal on the end of a stick, so we were drawing from a distance. The top one I went over and added detail with charcoal.


 These pieces were done in the Matise style


Life drawing - the middle stages of my development

As you can see, I'm starting to get into my own kind of technique with the life drawing now, using charcoal and being fairly messy with it, yet refined. I also started to focus on certain aspects of the body, mainly the torso. I found that I tended to start by drawing the head but I would then draw the body in a slightly bigger scale to the head that I had started off with!


We then went on to use white paint on black paper and paint with our fingers. I quite liked this technique as it's very messy and, it sounds cheesy, but I almost feel more engaged in the artwork because I'm using my hands rather than a pencil or charcoal. I do like the technique a lot, however the result is possibly a little too messy for my liking, not quite refined enough.


(below) this one is probably my favourite out of the finger painting pieces.

The drawings below are chalk on black paper, where we had to focus on drawing the light areas, using the black paper as the darkness. I quite like these drawings too as they are quite similar to the charcoal ones I did. This is a good technique to use and I enjoyed using it.


(below) I especially like this piece!


Painting with yellow, red and blue! We had to use blue for the dark areas, yellow for the light areas and red for the medium tones. I didn't use much red, as I just preferred to blend the yellow and blue, making the medium toned areas a green-ish colour. I used a small paintbrush and I quite like these pieces too!


(below) In this piece I combined finger painting and the colour / tone technique. I really like this a\s it's more refined than the white paint finger painting technique and the colour brings the piece to life.


I then returned to using a brush again, still avoiding using red... I have no idea why!


This is a drawing I did using an app on my iPhone called SketchbookX. My phone is relatively small so it was hard to draw on with my thumb and fingers!


This is a quick sketch of a guy in McDonalds done using the same app. The definition is pretty good if you consider the scale of my iPhone!

Life drawing - starting off

This is one 3rd of my life drawing from the start of the life drawing term to the end. You can really see how my techniques have developed and how, at least I think, I've improved at drawing!

These images below aren't great but they are the first life drawings I've ever done! The proportion isn't quite right and I didn't manage to finish them as I was trying to take my time and get the body as accurate as possible.


I think this one (below) is pretty decent for a first attempt. If I remember correctly, we had about 10 minutes on each pose to start with.


I quite like this one (below) but the head might be a little on the small side


(below) We had to draw without looking at our paper, looking at only the model... so this is what I came out with!

We got shorter timings for these drawings, getting down from 5 minutes to 1 second! This was to speed up our drawing speeds and get as much detail down in a short time as we could.

(below) I elongated the body a little too much in these drawings, but I was working a lot faster and getting the majority of the body drawn!

So overall, these drawings were not bad but not great either, and I've since proved that I can do a lot better! Check out my next two posts for the rest of my life drawings (the better ones!)